Download Stashcook Now. Get the best meal planning app for your family.

How to make Wholemeal Sourdough Bread Recipe
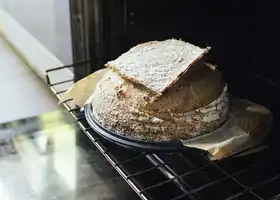
How to make Wholemeal Sourdough Bread recipe
Izy Hossack - Top With Cinnamon

A step by step guide complete with photos and GIFs on how to make a loaf of sourdough bread using wholemeal flour.

Ingredients

1 tbsp sourdough starter (100% hydration, recently fed)
50 g bread flour (I used dark rye flour)
50 g lukewarm water
500 g strong wholemeal bread flour
375 g lukewarm water
10 g fine table salt

Method

1
In a medium bowl, combine the sourdough, bread flour and water. Mix until all the flour is incorporated.
2
Cover the bowl with a piece of clingfilm (or a shower cap/damp towel/ bowl cover) and set it aside for 4-8 hours (depending on how warm the environment is). It’ll look bubbly and should have doubled in volume when it’s ready to go.
3
Scrape the bubbly levain into a larger bowl. To the larger bowl add the flour, water and salt. Mix together until the flour has just been incorporated. The dough will look quite ugly and lumpy at the moment! Cover the bowl with cling film and set it aside at room temperature for 30 minutes.
4
After your dough has rested for 30 minutes, uncover. Rinse your hands with water and don’t dry them – having damp hands stops the dough from sticking! With one of your damp hands, reach under the left side of the dough, grab the edge. Pull the edge up and fold it over to the opposite side of the dough. Repeat this with the right edge, top edge and bottom edge of the dough. Scoop your hand under the whole piece of dough, lift it up and flip it over in the bowl. This is one ‘fold’. See the GIFs in the post above for a visual explanation.
5
Cover the bowl with cling film and let the dough rest for 30 minutes again.
6
Repeat this ‘folding’ of the dough followed by a 30 minute rest 5 more times (i.e. you’re doing one ‘fold’ every 30 minutes until you’ve folded it a total of 6 times over a period of 3 hours).
7
After the 6th fold is complete, let the dough rest for 30 minutes.
8
After that last 30 minute rest, scoop the dough out onto a lightly floured work surface.
9
Grasp an edge of the dough, stretch it out then up and into the middle of the dough. Work your way around the dough so that you form a rough ball then flip the dough over so all those edges are underneath and the smooth surface of the dough is facing upwards.
10
Dust the dough with a bit of flour. Cup your hands around the dough and rotate it (my preference is to rotate the dough anti-clockwise) whilst kind of trying to scoop your hands slightly under the dough each time. The aim here is to build up surface tension i.e. get a nice, taut dough ball. This is why it’s essential to not have too much flour on the work surface – you want the dough to kind of stick to the surface so that it helps pull the dough in. If there’s too much flour, the dough will just slide around and not get any tighter. You can also see my video in the post above for the same shaping action.
11
Once the ball is pretty smooth, invert the mixing bowl you were using over it and let it rest for 30 minutes.
12
Use a bench scraper to flip the dough over. Repeat the same shaping method as before (stretching the edges of the dough into the centre, flipping it over and then cupping the dough whilst rotating it) to make the dough taut. Near the end of the video (in the post above) you’ll see me clear away the flour on the surface, plop the dough slightly further away from me and then drag it towards me with cupped hands – this also helps to build surface tension but I’m not sure of how easy others will find it to do. I learnt it from watching a youtube video, of course!
13
Use a bench scraper to lift the dough up, flip it over and place it into a floured banneton*.
14
Place the banneton with the dough into the fridge for 8-12 hours (I usually do this overnight).
15
When ready to bake: preheat the oven to 250 C (480 F) with a dutch oven / lidded casserole dish inside and leave for 45 minutes so that the dutch oven/casserole dish gets VERY HOT!
16
Meanwhile take the banneton out of the fridge, sprinkle the surface of the dough with cornmeal or flour and set it aside to come to room temperature. Cut a strip of baking paper, about as wide as the banneton, and dust it lightly with flour.
17
Once the dough has been sitting out for 45 minutes and the oven is preheated, tip the dough out onto the centre of the floured piece of baking paper.
18
Take the dutch oven/casserole dish out of the oven and set it down on a trivet/heatproof thing.
19
If the lid of your dutch oven/casserole dish is flat then flip the lid upside down use that to place your dough onto (as in the .gif in the post above) by lifting up the edges of the baking paper and lowering the bread + baking paper onto the lid. Swiftly slash the dough with a lame, razor blade or sharp knife (as in the .gif below). Make sure you only use the tip of the blade, not the whole edge of the blade, when slashing. You can do this in a square as I have here or do it in whatever pattern you want! Invert the base of the pot onto the lid.
20
If your dutch oven/casserole has a handle on the lid so you can’t invert it: Swiftly slash the dough with a lame (as described above). Lift the edges of the baking paper up then gently, carefully and quickly lower the whole thing (baking paper and dough) into the pot and place the lid on.
21
Once the dough is secured inside the hot dutch oven/casserole dish, lift the whole thing up and carefully slide it into the oven. Bake for 30 minutes.
22
After the bread has been baking for 30 minutes inside the dutch oven/casserole dish, carefully uncover it. Bake for a further 15-20 minutes uncovered until the bread is nicely darkened.
23
Let the bread cool for a few hours and then slice it. If you slice it whilst it’s hot it’ll be sticky, hard to slice and you’ll smush the dough #sadtimes. So, after you’ve put all this hard work into making the bread, give it a lil respect and do let it cool before cutting into it!

© Copyright 2024 Stashbox Ltd. All rights reserved.